25.1.08

Grandmas are Cool.

One of my goals in Life is to become a Very Cool Grandmother. Because Grandmas, in general, are awesome. I have memories as a child going over to Grandma Mary’s house and immediately heading for the large, stand-up freezer in her entryway...where I knew there was a Lifetime Supply of ice-cream sandwiches. And at Grandma’s house, you were allowed to eat whatever you wanted, whenever you wanted.

At my Grandma Evelyn’s house, every Sunday morning was filled with fluffy homemade biscuits, thick, incredibly rich gravy and piles of bacon that crumbled in your mouth with a satisfyingly resounding crunch. Better still, everyone at the breakfast table knew my love of bacon and graciously offered me any of the extra slices at the end of the meal. Ah, it was a budding food-loving child’s heaven. My mother has already informed me that when I finally make her a grandmother, and she says this with a loud sigh, rolling her eyes and exasperation in her voice, she is going to completely spoil my children. Great, so while I'm trying to get my kids to eat fresh figs, artichokes and steamed kale, she's going to be giving them slurpees from the local Dairy Queen. Grandmothers, she figures, have earned the right. Touché, mom, touché.

LB’s grandmother, Mimi, is Italian. Mimi has what I, as someone who has not yet made the trek across the pond to Italy, might consider as having Quintessential Italian Characteristics (or at least characteristics that I might imagine an Italian grandmother having). Namely, when you walk into her house you are immediately offered food: crispy bacon (my favorite), scrambled eggs, panettone, eggplant Parmesan, pancetta, fresh cheese...the list goes on and on.

Mimi and LB

I love visiting Mimi. This Christmas, we had Mimi show us how to cook some of her favorite recipes so that we could learn them and so that they would be passed on in the family. It was a day filled with laughter and love: our hands dug deep into bowls of flour, we sprinkled breadcrumbs, ate marinated olives, cured meats and mozzarella, we imbibed glasses of Italian wine (for it was surely noon somewhere in the world), and by the end of the day, our bellies were filled with lots of good, home-cooked Italian food.

We let Mimi decide the recipes she would like to pass on – LB had told her he would like to make something that might be lost if she didn’t pass it on herself. She decided to share one of her favorite recipes, Eggplant Parmesan, and one that her father had taught her and would make whenever company came over: "Company Meatloaf." To be honest, at first I was slightly disappointed at the thought of making meat loaf (the original decision was to make homemade gnocci). And, as I’ve professed here before, meatloaf is not one of my favorite dishes to eat. In fact, it’s difficult for me to get all the way down to my stomach sometimes. And even more difficult for me to keep it down there. But, we were grateful that she was taking us in to show us a family recipe, and being the newbie in the family, there was NO WAY I was going to say one word about not liking meatloaf.

My own biases aside, the meatloaf got rave reviews from the table. And for meatloaf, it was definitely the best meatloaf I’ve had – not that I’ve had much, nor do I intend on having much in the future. But I ate every bite (of course I did - you don't mess with Italian grandmothers!) and the proscuitto and mozzarella make for a tender, moist and delicious combination. For those of you that DO enjoy a meatloaf on occasion, you should certainly try it like this. Just the act of making it is a pure joy, especially when you’re making it alongside a little Italian grandmother.

First, whip up a batch of your favorite meatloaf (if you're into that sorf of thing). Try Nicole's - because it's actually a meatloaf that I would most definitely eat (yes, even me) and that I'd consider making again (although I haven't...I have to face the truth, meatloaf is just not one of my favorite dishes). Mimi makes hers with 1 lb of ground beef and 1/2 lb of ground pork for moisture.

Dump out your pile of meatloaf mix onto some wax paper and pat it out into the shape of a rectangle until it is very thin - about 1/2 inch thin. Then, layer paper thin slices of proscuitto on top.
Follow that with a hefty sprinkling of mozzarella cheese - finely shredded or grated. Don't buy the previously shredded stuff, because you're going to need slices of it for the top too...


Roll it up like you would a jelly roll, starting at one end, until you have a roll o' meat, as opposed to your usual loaf o' meat. Put it on a cookie sheet, and bake at 350F for about 40 minutes. Remove it from the oven, and layer thin slices of mozzarella across the top of the roll (Mimi cuts them into rectangles or squares, then halved them diagonally to make pretty little cheese triangles). Put it back in the oven for 15 minutes, or until the meat is done in the center, but the ends aren't yet dry, and the cheese has melted and gotten bubbly (you'll have to keep an eye it and determine the times that are best for your oven ...Mimi has this down pat for her own oven, but better safe than sorry). Sorry there's no finished picture - meatloaf just isn't the most photogenic of foods, and besides, I was busy eating Eggplant Parmesan (oh yeah, and meatloaf too).

So there you have it - meatloaf fit even for company. Meatloaf that can bring together little Italian grandmothers and non-meatloaf eaters alike, and make them both happy. Besides, the way I figure it, every Cool Grandma should know how to make at least one good meatloaf...just in case someone that loves meatloaf happens to come over.
12.10.06

"12 Pies Men Like Best" and Other Treasures


Just recently, I was able to sit down with my grandmother and sort through all of her recipes and cookbooks because she is no longer able to spend much time in the kitchen and my grandfather has become the primary cook in the house. There were certainly many treasures to be found. The first of the treasures she gave me was a book called "12 Pies Men Like Best," which I find just hilarious. How June Cleaver-ish! It was some kind of advertisement from Proctor and Gamble in 1931. The front of the little pamphlet shows a woman in an apron holding out a pie to a smartly dressed man. Like I want to make pies that men like because men like them! Ha! I want to make pies because I like them (although, um, uh, I guess I do try to make stuff that LB likes...)!

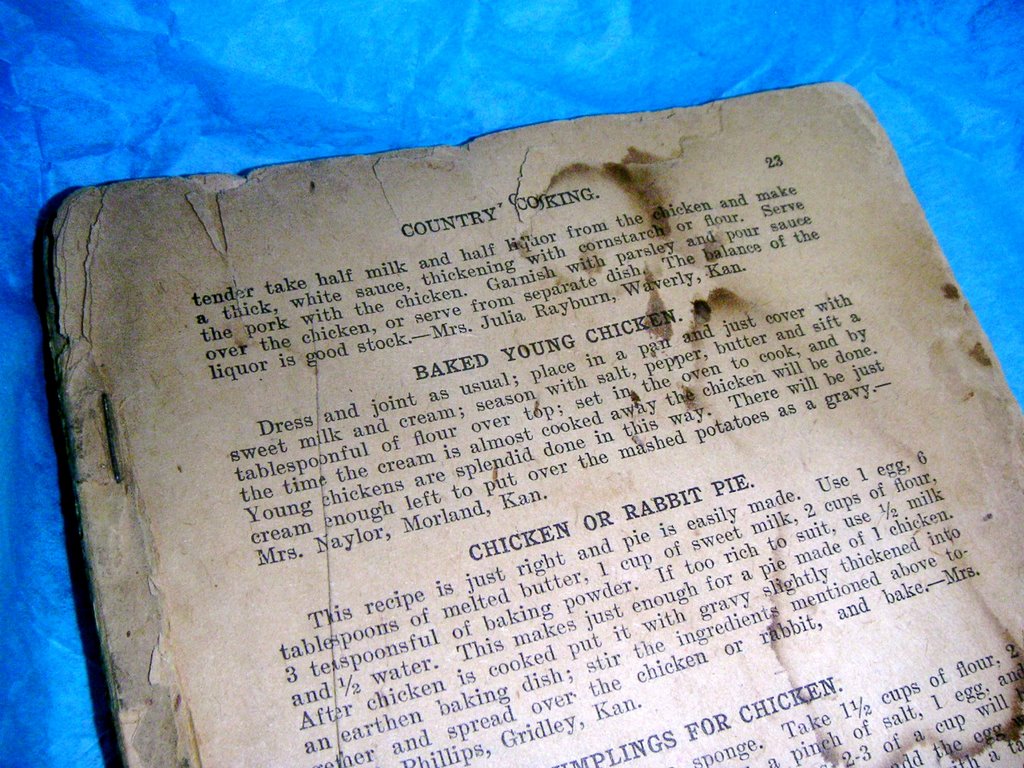
The next treasure was the cookbook pictured above; this one belonged to my grandmother's mother, my great-grandmother. I have no idea how old it is because unfortunately, the cover is missing, but it looks to be quite old, worn and well-used. I've tried finding the title on the web to figure out its publication date to no avail (there are cookbooks with this same name published in the 1800s all the way to the 1930s). But since it belonged to my grandmother's mother, and my great grandmother died when my grandma was young, it has to at least be at least as old as the 1930s. It's so amazing though: It's a compilation of recipes from home cooks around the U.S. and there are recipes for such dishes as rabbit pie, chow chow, watermelon ice cream, "luscious cake," and sour pickles. You can also note that the instructions are far less detailed than they are today, making me think that women, since they spent so much time in the home those days, had much more knowledge than I do about how to do things (like "make a pie crust that is delicately baked," and dress and joint a chicken "as usual") so that there didn't need to be much instruction in the recipe for them to follow. It's just amazing to look through! I'm definitely going to try some of these recipes when I get around to it...now, if I can only figure out how to dress and joint a chicken...

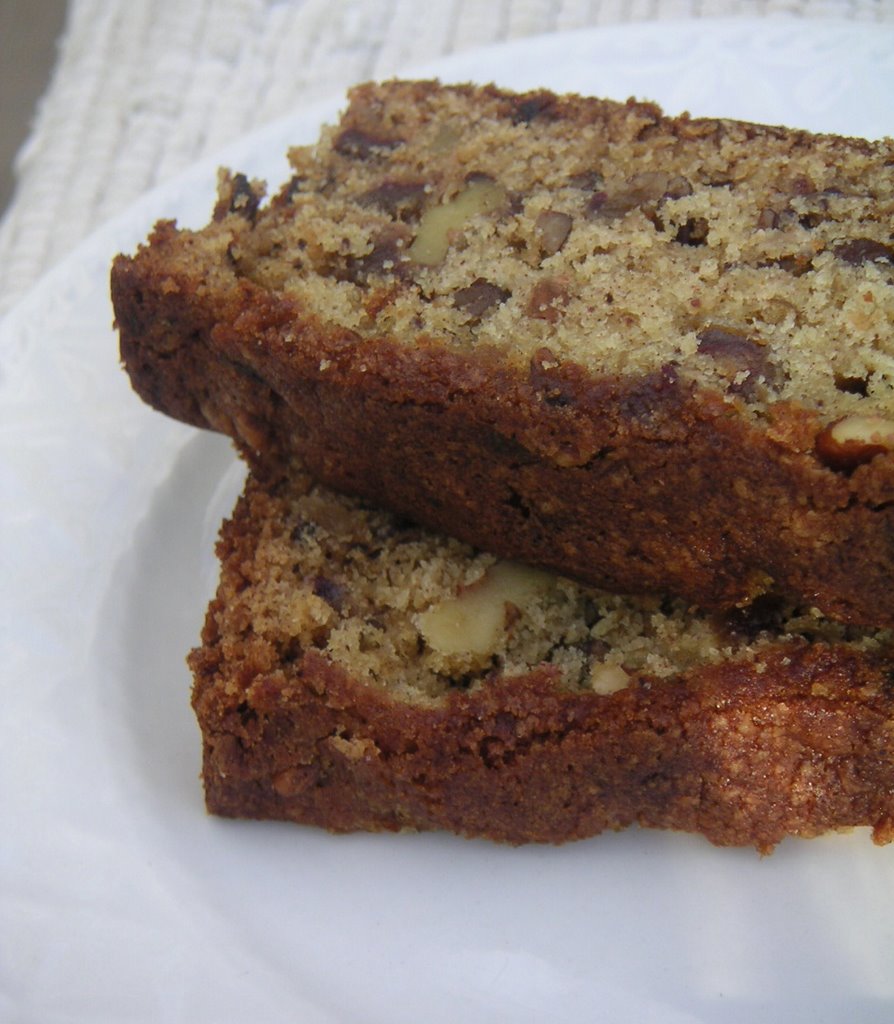
But lately, the one thing I've been treasuring most of all, was my great-grandmother's recipe for Date Nut Loaf Cake. I've decided that just as she passed it on to me, I will pass it on to you, because it's delcious! It's called a cake, but it's more like banana or zucchini bread...it's rich and dense, with a very distinct caramel flavor to it - especially in the end pieces (my favorite). It's also a wonderfully refreshing contrast to the usual banana or zucchini bread. At first I thought that perhaps I had written things down wrong because there were no spices in the ingredient list - but no, it has so much flavor to it that there's no need (although, I may try adding some cardamom or perhaps a little cinnamon next time, just to see what it ends up like). The recipe is also done a little differently than I normally would do things; for instance, creaming the butter and sugar and eggs together (I usually would do sugar and butter together, then do eggs one at a time), but this works too, so I've just written it as she did. Another note: the humidity of where you live will make a big difference in the texture of the loaf. I made this in Oregon exactly as written and it came out beautifully - I made it in Colorado and it came out crumbly and didn't hold together well, so you may need to fiddle with the amount of liquid if that happens to you.


Great-Grandma's Date Nut Loaf Cake, recipe courtesy of my grandmother

1 cup butter or trans-fat free shortening (the original calls for shortening)
2 eggs
1/2 tsp salt
1 cup hot water
1 lb. nuts (pecans in her recipe, although I used a mixture of pecans and walnuts)
1 1/2 cup sugar
1 tsp. baking soda
2 1/2 cup flour
1 lb. pitted dates, chopped
1 tsp. baking powder

Chop the dates and put them in a bowl. Sprinkle them with baking soda and add hot water. Mix, then let stand until cool. Cream together butter, sugar and eggs, then mix together flour, baking powder, salt and nuts in a separate bowl. Beat together the butter mixture with the flour mixture and date mixture, alternating between them and ending on the dates. Bake 1 hour at 300 F.

This is best made in a cast iron skillet, supposedly. If you don't have one (like I don't), it will make two standard-sized loaf pans of the bread (I'm not sure of the size of the cast iron skillet she used either). Be sure and grease them, and line the bottom with either a sized piece of brown paper grocery bag (grandma's way) or parchment paper (my way). Important: No matter which container you're cooking in, about 15 minutes into baking, you'll want to put tin foil around the edges to prevent them from burning...this gives it that nice caramelized crust. Enjoy!

18.9.06

Returning to my roots...part 1


The weather is getting cooler now, and I can tell that Fall is upon us. The leaves have begun to trade their brilliant green hues for softer yellows, reds and browns and then make their final journey to the ground. The air grows crisp in the mornings and the first rains are falling from the heavens, and my body, in turn, begins to yearn for clothes that cling softly to my skin, down comforters, closed-toed shoes and food that warms my soul.

Fall is, by far, my favorite season. The smells, the chill in the air, the colors, the feeling of a new beginning (perhaps this feeling should come in Springtime, but for someone who has been in school now for almost 17 years, Fall is when everything begins anew), but it's also about the food. This may have been why I began my little food blog in the Fall, a little over one year ago. I find I don't mind spending long hours in the kitchen since it is far cooler than it has been the last few months. And the food at the market is food that brings back so many good memories and is as ripe with childhood nostalgia as it is with flavor. Apples, grapes, eggplant, mushrooms, figs, and heavy, red tomatoes. At the grocery store, I find my choices are now leaning towards richer, heavier foods...picking out free-range chickens for both dinner and batches of homemade chicken stock, spices like sage and thyme, heady cheeses, and thick, hearty breads.

The last time I was home, I sat with my grandmother (my dad's mother, not the one who recently passed away) and we dove through her recipes and cookbooks, seeking out her favorites and my favorites and the ones that she wanted to pass down to me since she knows how much I love to cook, and she isn't able to do the cooking any longer. There were recipes for casseroles of all kinds, yeast breads and rolls, ethnic recipes (Guamanian chicken is one that I'll share later, from when she lived in Guam), and several of her own mother's dishes.

What I remember most about the time spent with my grandmother in my childhood are the breakfasts - lots of fresh biscuits and gravy, scrambled eggs, and bacon. But secondary to those feasts, I remember the trips to Texas. My grandmother was the second oldest child in a family with 8 children. She was born in Texas and many of her siblings still reside all over the state. We used to go there for family reunions when I was younger. And Lord, can those Texans cook! Anything fried was certainly a specialty, but my favorite? Fried okra. Nobody, and I mean, nobody, can make fried okra taste like a Texan can. And lucky me? There's been loads of these fresh, green pods at the Farmer's Market, nestled in with all that gorgeous Fall produce.

My first attempt at fried okra, via grandma's word of mouth and the way her family has always cooked it, is what follows. And it's delicious. It's not healthy, but sometimes family recipes trump healthy, and anyway, who cares if it's healthy? It's freakin' delicious! Besides, since it is Fall, we should be storing up for Winter, right? Beware making too large of quantities of this - it goes down like popcorn and it's difficult to stop eating it.

Eakin Family Fried Okra, recipe courtesy of Evelyn Baysinger

Get yourself several pods of fresh okra or a bag of frozen okra (though not quite as good, still pretty darn tasty). Whisk together 1 or 2 whole eggs in a bowl, depending on how much okra you have. In another bowl, put 1/4 to 1/2 cup of flour and an equal amount of cornmeal. Put this flour mixture inside a large ziplock bag and add salt, pepper and avery slight pinch of cayenne pepper.

Now, here's the secret: Cook 1/2 lb - 1 lb of your favorite smoked bacon in a heavy pan (cast iron would be ideal) until crisp. Remove the bacon and drain on a paper towel. Reserve the bacon for another use, and reserve the bacon grease to cook your okra in (Aha! That's why it tastes so delicious!). Keep the heat at a moderate heat, then if you have fresh okra pods, cut them into 1/2" pieces and put them directly in the bowl with the egg. Mix until all of the pieces of okra are coated well. Pick them out with a slotted spoon and add them to the bag with the four/cornmeal mixture. Close up the bag and shake it gently until all the okra is coated with the flour mixture. Pick a good handful of okra out and shake off the excess flour (there won't be much), then add it to the pan with the bacon grease. Fry the okra until it turns golden brown on all sides, turning as needed. Drain the grease off the okra on a paper towel and repeat, cooking the rest of the okra. Attempt to restrain from eating the entire plate full.

I served the okra with Chicken with Lots of Garlic, turnips with bread crumbs and parsely, and wilted turnip greens. For dessert, Great-grandma's Date Nut Loaf Cake (I'll post this one soon too).