12.6.06

Take your time...


As we all know, Life often has a way of bumping our cooking, cleaning and even our relationships with the friends we care about, to the side-burner while it takes over. I’m definitely guilty of letting things like school take precedence over all of these at times, as well as my blogging.

Or, perhaps these are just times when I'm letting school take over My Life...

"Life is what happens to you while
you're busy making other plans." John Lennon


But, then I saw this quote in a magazine a while back, and I wrote it down as a reminder...

"The best reason to take your time is that
this time is the only time you'll ever have.
You must take it, or it will be taken from you.
It is telling that the phrase "taking your time"
is synonymous with slowing down.
If we want to live life fully, we do best to slow down.
I don't suggest that we turn back the clock,
trying to retrieve a bygone era when life was slower.
We couldn't, even if we wanted to.
But I don't believe that we should want to.
We should revel in our electronically
supercharged, unbounded world.
But, to make the most out of this new world,
to avoid feeling overbooked, overstretched,
and about to snap, to make modern life
become better than life has ever been,
a person must learn how to do what matters most first.
Otherwise, you will bulldoze over life's best moments.
You won't notice the little charms that adorn each day,
nor will you ever transform
the mundane into the extraordinary."

Taken from the postscript of Real Simple Magazine, who excerpted it from the book Crazybusy, by Edward M. Hallowell, M.D.

For those of us that are busy more often than not, and spend a fair amount of time stressed out, overworked and trying (somehow) to fit everything in, it's important to stop (fairly often), for just a moment, to think about what's really important, and let ourselves enjoy those small, wonderous moments we can allow ourselves, even in the midst of all the craziness. And believe me, no matter how busy we think we can get, it is so, so important to make time for those special friends and for family, even if it's just to drop them a note to say "I care about you" or to pick up the phone and say hello.

That said, it’s also important to have meal ideas for those times when Life gets busy and we need to significantly shorten our cooking time so that we can have those few small moments and indulge in spending time with friends and family.

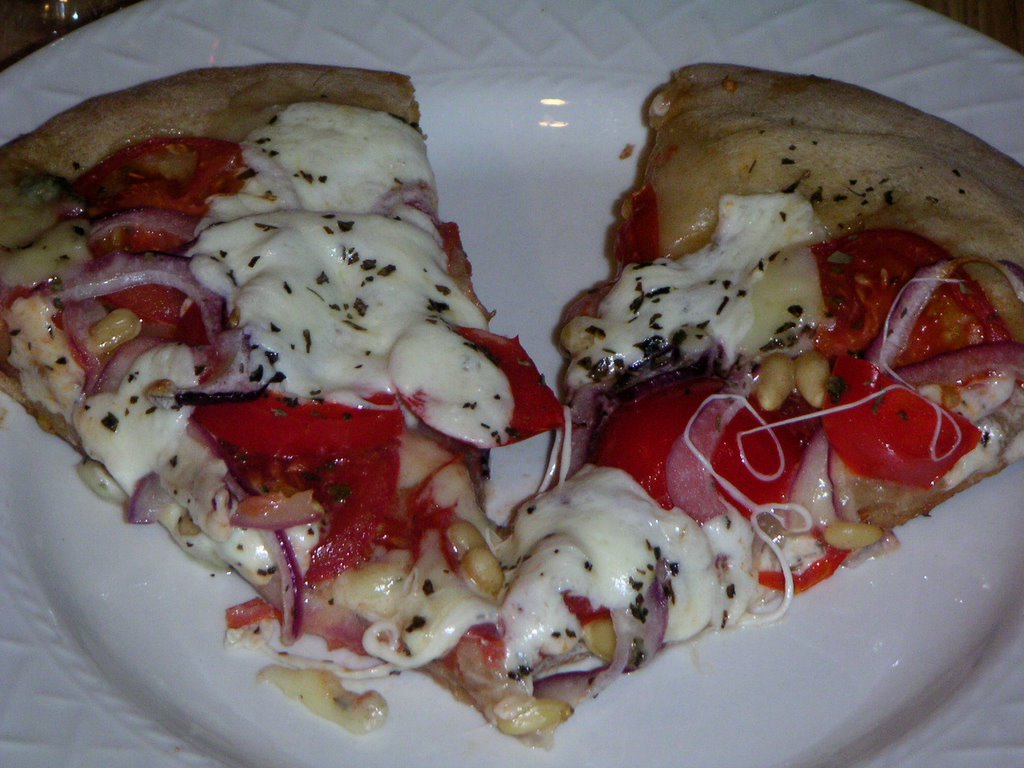
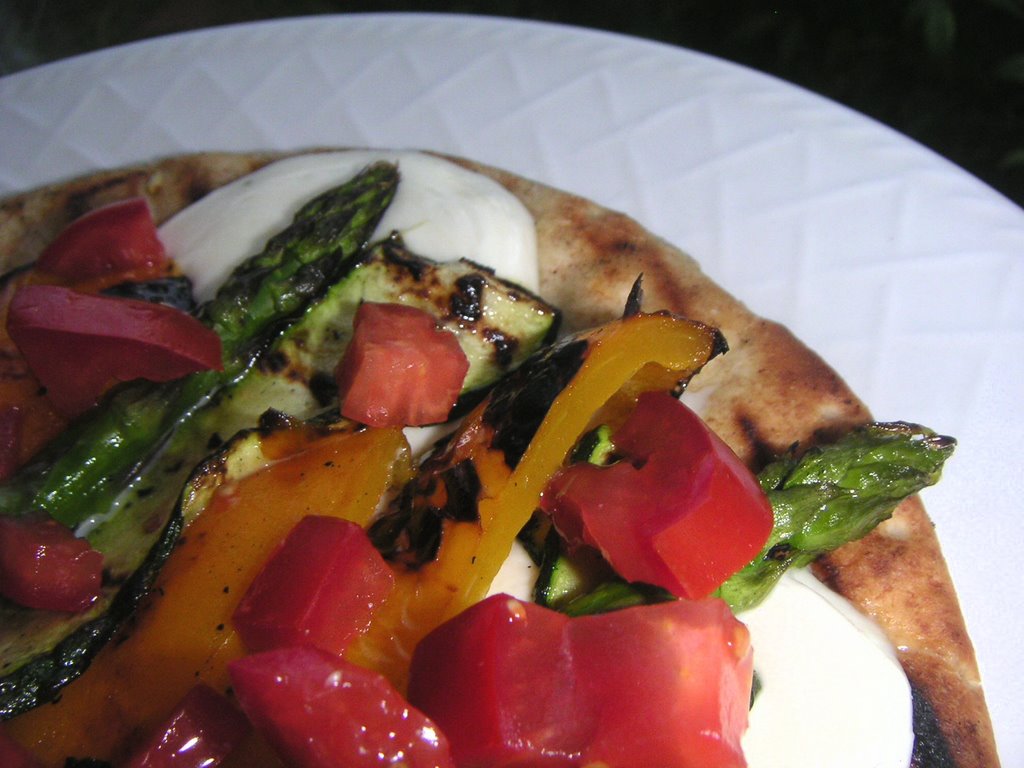
This is an easy recipe, and it was so tasty and felt so fresh and seasonal, that it will definitely be gracing our table on another busy night. Better yet? It’s even called “Summer Bounty” Flatbread...how's that for fresh and delicious? (True, it’s still Spring here, but who’s keeping track?) Enjoy those moments!

Summer Bounty Flatbread, From Terri Parish at PC Market of Choice

2 medium balls of fresh mozzarella
olive oil, salt and pepper
1 small summer squash or zucchini, sliced lengthwise
1 bunch of asparagus
1 medium orange bell pepper
2 greek-style pita breads (or flatbread)
1 medium Roma tomato, chopped

Seasoning oil:
1/2 cup olive oil
1 tbsp. Garlic, minced
1 rosemary sprig, chopped
salt and pepper to taste

Thinly slice the mozzarella; let drain. Sprinkle oil, salt and pepper on the orange pepper, squash and asparagus. Grill until tender (this only takes a few minutes). Set aside, and then slice the pepper into strips. Combine the ingredients for the seasoning oil; brush liberally onto both sides of each pita. Place pitas on a hot grill until the first side is crisp. Working quickly, flip pitas and layer mozzarella, asparagus, pepper and squash on the pita. When the second side is crisp, turn off the grill, close the hood, and let the mozzarella melt. Top with chopped tomatoes and serve. Serves 2.

6.6.06

Memes, memes, musical fruit?

Clare, my aussie host with the most kitties and yummy recipes I've ever seen, tagged me for this meme...The 5 Items Meme.

5 items in my fridge
Opened homemade jam (Black currant, fig, strawberry, blackberry...)
Organic non-fat milk (Milk is one thing I refuse to have be "conventional")
Too many condiments (Like Nerissa)
Our roommate's food (...Rotting in there unless I decide to throw it out)
Lots of fresh veggies (Right now: asparagus, bell peppers, spring greens (baby greens mix), green beans, beets...that's all I can think of right now...)

5 items in my closet
Lots of sweaters (It's chilly here during the rainy winter!)
Lots of shoes (I like shoes...but I think I only wear about 2-3 pairs...)
Loving Boyfriend's clothes (These take up way more space than I think they should...a girl should have more than half of the closet space...we have lots of clothes!)
Loving Boyfriend's shoes (Also taking up more space than should be permitted)
Mold (It raged an unfair attack on my shoes this winter...EW. It's so damp here in the winter!)

5 items in my car
Um, my car isn't running right now, so therefore it is completely devoid of my stuff...I've currently taken over LB's car...5 items I share that are in his car:
Dog blankets
Dog towels
Sunscreen
One hair tie (for when the wind makes my hair stick to my chapsticked lips...I hate that!)
A very small assortment of CDs (we've had our car broken into in our driveway and everything stolen before)

5 items in my purse
Um, I don't really have a "purse"...I always leave it in some bar or restaurant or person's house if I attempt to be a "girl with a purse" and so, I usually just carry the necessary cards in my back pocket. BUT if I had a purse...it would be cute...and it would probably have in it...
A bunch of receipts
A wallet containing all of my cards I could possibly need (I seem to always be without the one I need at the time...)
Powder and lipstick (for special occasions...come on, I'm a marine biologist and a lab rat!)
Chapstick
Cell phone? (Maybe...I don't like being "electronically leashed" as my dad calls it unless I have to be...)

5 bloggers thusly tagged
Deetsa's Diningroom
Kitchen Queen
Pie in the Sky
Messy Cucina
Mana Makan - The feast crusade

Back in the day...

Remember the days when grandma (or maybe mom) used to cool her pies in the windowsill on a sunny day in the Spring or Summer - a towel draped underneath the pie plate, a cool breeze blowing across the surface of that crispy, golden crust?

Okay, so no one I know does this, as someone would probably steal it off the windowsill, dogs would get into it and eat the whole thing, or maybe some big black bug might come along and decide to take up residence in your beautiful pie, but come on, some of you must have known somebody that did? Or, perhaps it's just one of those June Cleaver memories, imbedded in the mind as what the perfect wife (or girlfriend, as the case may be) would do with her culinary creations in the summertime, beckoning the children home from playing with their friends...well, I'm certainly not perfect, but hey, 'when in Rome...'

I, for one, wish I had a big windowsill that was safe from big hairy dogs and big black bugs. Especially because I made this rhubarb pie for our Spring menu at Supper Club a few weeks ago, and it had to cool for at least 4 hours before we cut into it (What a perfect opportunity to be the "perfect" girlfriend, no?). And there is nothing more Spring-like than a rustic rhubarb pie. But alas, I settled for resting it on the outside deck rail only long enough to snap a quick picture in the sunshine (the glorious, glorious finally arrived sunshine), then rushed it back inside to safety.

But I could imagine it cooling out there, and that's all I needed to feel content, and like Spring had finally come to Oregon. Yay! I knew as soon as I published this post, I'd be jinxing myself and the freezing rain would come pouring down for the whole rest of the week (as it has been this entire week), but for short time, Spring and gorgeous weather had come, and I enjoyed every spare moment I could squeeze out of it! I dug through the recesses of our drawers until I found my sunglasses, dusted them off, and donned them for my first sunny trip to the Farmer's Market, where I got two pounds of brilliantly red, freshly picked rhubarb for this pie. Thankfully, rain or shine, our farmer's market is now in full swing - the best part about Spring.

We cheated on the crust, and bought it from the grocery store (shh, don't tell!), and next time I think I'll try to make my own. It tasted fine, but got that unattractive glossy transluscent crust look (does this ever happen to you??) on the top...which may not have been a result of just the crust, but if anyone can tell me how to get rid of that, please do! We served it with vanilla bean ice cream (essential!), and the pie itself was tart, but not too tongue-twistingly eye-cringingly cheek-dimpling tart, and had a pleasant sweetness to it that helped balance it out. This was both my first pie, and my first rhubarb pie. Next time, perhaps, I may add a bit more sugar to the recipe (confession: okay, I did do the eye-cringing a little bit), or try a few other versions, just to see what I like best. Any recommendations?

Rhubarb pie, from Martha Stewart Living

2 lbs. rhubarb, trimmed and cut into 1/2 inch pieces
1 1/3 cup granulated sugar
1/4 cup cornstarch
pinch of coarse sea salt
1 tsp. finely grated lemon zest plus 1 tbsp. fresh lemon juice
2 tbsp. unsalted butter, cut into pieces
1 tbsp. heavy cream
1 large egg yolk
fine sanding sugar, for sprinkling

1. Preheat oven to 375F, with rack in bottom third. Stir together rhubarb, granulated sugar, cornstarch, salt, and lemon zest and juice in a large bowl. Set aside.
2. On a floured surface, roll out half the dough into a 13'' round, about 1/8 inch thick. Fit into a 9 1/2 inch deeo-dish glass pie plate. Fill with rhubarb mixture and dot with butter. Refrigerate.
3. On a lightly floured surface, roll out the remaining dough, and drape over the filling. Trim the edges to 1 inch, then fold under and crimp. Make 5 large slits in the crust to vent the steam, and refrigerate another 15 minutes.
4. Whisk cream and egg yolk in a small bowl. Brush over crust, then sprinkle crust with sanding sugar. Bake until the bottom crust is golden and the filling is bubbling vigorously, about 1 hour and 25 minutes. Cover with foil if browning too quickly (I had to do this). Let cool at least 4 hours (I might do a bit longer, as my pie was still a little runnier than I wanted it to be). Enjoy!

31.5.06

Curried vegetable-potato samosas


Those of you that have been reading for a while know that I'm an avid recipe-follower. Sure, I'll make adjustments to a recipe - add in ingredients that I think taste better, or are more in-season, fresh herbs for dried, or occasionally low-fat ingredients in place of their full-fat versions if I'm in a "keeping my girlish figure" or "need to eat healthier" kick. But over-all, I'm a slave to recipes, as some of my blog friends have even alluded to with good-natured teasing and gentle urging to break out of my shackles. Most of the time, I'll look in my fridge, see what I have left over from the week's farmer's market or grocery shopping and spend countless minutes looking through cookbooks or magazines for any recipe featuring a single ingredient that I don't want to go to waste. This, I know, is a fat waste of my precious time.

So last week, coming home after a long day of work and without a recipe in mind, (usually, I shop with a few recipes I want to make in mind, but also get what looks freshest, sounds tasty, whatever I've been craving or I've never seen before and simply CAN'T LIVE WITHOUT), saw I had a few potatoes left over from the farmer's market (looked tasty), swiss chard (looked freshest), baby walla walla onions (been cravin') and half a jar of left-over sweet and sour carrot chutney from our trip to San Franscisco (COULDN'T LIVE WITHOUT). Hmmm... everything needed to be used up, so how could I use them all in a semi-coherent dinner?

This is what I came up with...I call them Curried Vegetable-Potato Samosas because I don't know what else to call them. I don't really know if these fit the definition of a samosa, because they weren't triangular and they weren't fried, but that was the word that came to mind. I boiled the potatoes until they were tender, then mashed them up with a little olive oil. I sauteed the baby walla wallas, bok choy, and swiss chard together with some frozen petite peas, then added about a tablespoon of curry powder, a bit of salt and pepper. But how was I going to get this delicious-tasting mixture to my mouth? Ah, there's nothing like a little pastry to do the trick. I grabbed some totally frozen phyllo dough from the freezer and attempted a quick-thaw in the microwave.

Don't do this.

Yes, there is always a disaster when I attempt to do something completely on my own. See here, here and here for evidence of this if you don't believe me. Let the phyllo dough thaw in the refrigerator for several hours or overnight, then let it come to room temperature before you attempt to use it, if you have the foresight. I, myself, completely lack foresight. My hindsight, however, is 20/20. If you do like I did, your phyllo dough will dry out, melt together and turn into a big mess when you try to unroll it. :) For the record, in an attempt to somewhat redeem myself, I did thaw it in 5 second intervals, rolling it around to try and get gentle, even thawing...but it still wasn't pretty.

Instead, be a good girl (or boy), let it thaw properly, unroll it gently and keep it covered until you're ready to use it. If you do so, you will be able to pull single sheets of phyllo dough apart (covering the rest until you're ready for it), lightly butter (with melted butter and a pastry brush) or spray each sheet with cooking spray as you do until you've got 3-4 sheets laid down, and make perfect little food packages. Me, I just tore off as much as I could get apart, sprayed the whole bunch, and lopped said potato-mixture into the middle, rolling it up as best I could. Finally, I sprayed (or you could butter) the top, and put the finished product on a cooking sheet covered with parchment paper... The second disaster was that I ran out of cooking spray, as I was in too much of a hurry trying not to let my improperly thawed phyllo dough dry out, so the outside of the last one didn't get sprayed, didn't brown very well and thus, didn't look very appetizing (but it did still taste good, thankfully). If you do everything properly, your somosas will be crunchy on the outside, with brown layers throughout (unlike mine), and soft and flavorful on the inside. Alternatively, you could deep fry them, but this is much healthier. I served them with the sweet and sour carrot chutney (Divine.) and this was my bungled attempt at freeing myself from recipe slavery. It wasn't exactly pretty, but it didn't taste too shabby either. There could be lots of variation on this particular dish - hopefully your attempts will be a bit more elegant than my own. Good luck, my friends. May the chef-force be with you. Or may there at least be a little food-fairy to watch over you and protect you from follies like my own.

**I'll be gone until Monday for field work down at the coast (yay Marine Biology), but I'll add the address - there isn't a website - for the chutney when I return. Have a great rest of the week, and weekend, and hopefully I'll be coming back with some fresh Dungeness crab that needs to be used up (considering that's the animal I work with - smart foodie scientist pick their experimental subjects carefully!).

29.5.06

Beans, beans...musical fruit


Beans, beans, musical fruit
The more you eat, the more you toot
The more you toot, the better you feel
So let's eat beans for every meal!

My step-dad loves to make people laugh. When I was a teenager, he used to love to embarrass me out in public. Pulling his hat down so that it met his eyebrows, sucking his lower jaw up so that his bottom lip completely encompassed his upper one and walking like an ape was a favorite past-time of his whenever we walked out of movie theaters. He would sing silly songs, like the one above, to make us giggle and make sure we would eat those funny looking legumes we often found on our dinner plates. His hugs were like wonderfully-suffocating bear embraces (and still are!), so that you were left gasping for air and "knowing that you were loved."

This goofiness evolved to include good-natured torturing of teenage suitors coming to our home when I reached dating age. He'd reach out to shake the poor boys' hands, engufing their tiny appendages in his enormous retired football player-sized hands (he played for the University of Colorado Buffaloes in college), invite them in to see his "gun collection" and show off his trophies for skeet and target shooting...in fact, at a recent wedding of a good friend of mine, when LB met one of my ex-boyfriends, the guy jokingly told him to be sure if he ever pissed my step-dad off, to be sure to "Run in a zig-zag!" There was also the annoying habit of his of flicking the outside lights on and off and on and off and on and off if I stayed out there too long after he heard the car come into the driveway. Luckily, I wasn't the only one whose boyfriends he picked on...my brother in law, Chip, the man who married my oldest sister, still has the endearing nickname of "Cow-chip."

Yo, cow-chip, how's about getting me another beer while you're up?

All of this, of course, drove me crazy when I was younger. But as I grow older and start thinking about what kind of a parent I'd like to be, I see the merit of this type of harassment...
My favorite joke of LB's - now Dr. LB - is his claim that the only people he'll really require anyone to use his credentials when addressing him, are the young men that come to court any future daughters: "Mr. LB? Mr. LB? I didn't spend 5 years getting a Ph.D. to be called 'Mr.," son - that's Dr. LB to you!" He he he...

Yep, my step-dad is one-of-a-kind. A unique individual - he helped me weed out the weak men in my life, and figure out the good, strong ones (he does like LB); he taught me the value of laughter as the best medicine for anything, and best of all, he taught me to eat my beans.

This recipe belongs to another dad I know, and one of the first gourmet home-chef's I ever met, even before I had realized my own love of food and cooking. My step-dad's specialty is "Taters- N-Onions" and Mickey-Mouse pancakes - those were the only two dishes we ever got when mom was out of town, but they were sure tasty in their own right. These I just call "Peter's Beer Beans." I've made them countless times, but I recently brought them to our Supper Club dinner to accompany homemade enchiladas and they went over really well. They're easy, and delicious.

Peter's Beer Beans, courtesy of Dr. Peter Fields
Serves 6.

2 cans of black beans, rinsed and drained
1 small onion, diced
1 bottle of beer - use a good beer, nothing too watery, but no stout (Sierra Nevada or Bridgeport IPA or any amber or pale ale works well)
2 tsp. sugar
2-4 tsp. red wine vinegar
2 cloves of garlic
2 tsp. chili powder
salt and pepper to taste

In a medium saucepan, saute onions in olive oil until translucent. Add beans to onion. Pour in 1/2 to 3/4 bottle of beer, then add sugar, vinegar (to taste), garlic cloves, and chili powder. Simmer, uncovered until beer is cooked down. Add salt and pepper to taste. Enjoy!


24.5.06

Change is good


Spring is all about change. As winter leaves us (albeit slowly), and whispers of summer blow gently in on the breeze, there is an almost tangible sense of the world renewing itself...life is emerging from the ground, in the buds on the trees, and even from the animals we know and love. Lives change too...Loving Boyfriend has finished his degree, and our days of eating lunch together every day in the same building, of bouncing ideas off each other for projects and experiments, of having him just around the corner when I need a partner in crime to escape for a sunny day are now numbered...I still have almost an entire year of research left to finish my own degree. This type of change can be bittersweet - I feel simultaneously proud of him, sad to let this part of our lives end (we met the beginning of my first year), and yet still looking forward to and excited for the life we'll begin together in Hawaii next year.

Love is definitely in the air this Spring - several of my favorite blogger friends (as well as college friends, Eugene friends, and even family members) have recently had their lives change as well - in the best way possible. They're "tying the knot" with those they've fallen in love with, and I coudn't be happier for each of them! If you get a chance, stop by Clare, Michele and Molly's blogs and give them a virtual congratulations - not only are they wonderfully sweet women, but their blogs are full of delectable recipes and gorgeous photography.

Spring also brings feelings of a new beginning for me. As if the proverbial "slate" has been wiped clean and fresh. As the clouds begin to break, the sun comes out and the ground begins to dry, I find it's much easier to want to take the dogs for their evening walk. My muscles ache to get exercise - to get outside and garden, to go hiking, backpacking, or climbing. And just as I found that I wanted more hearty dishes, starches and warm, homey "comfort" food with the arrival of winter, I find that I'm now craving fresh fruit and vegetables, as well as lighter, cooler and most of all, healthier foods.

When I saw this dish (basking in the pure simplicity and laziness of an hour of lounging on the couch in my pajamas and surrounded by cooking magazines), I immediately wanted to make it: Salmon and Barley Salad. It's supposed to be a side dish, but we found it made a filling and delicious main course for two...perfect for a warm spring evening. I have a new love for barley, after making a fresh-tasting simple vegetable barley soup a few weeks ago (I'll post that too, eventually), so you'll probably be seeing a bit more of it here in the future. It's hearty, because it's packed with fiber, but doesn't feel heavy. The salad has cucumbers and thin slices of purple onions, and is topped with a vinaigrette made of lemon juice, dill, and a flavorful olive oil that make it a perfect accompaniment to the salmon. This one will definitely be made again in our house.

Salmon and Barley Salad, from Martha Stewart Living
Serves 2 as a main course, 6 as a side (or, maybe 4?)

1/2 cup pearl barley, rinsed and drained
1/2 cup dry white wine
1/4 cup whole black peppercorns
1 tsp. coarse salt
1 bay leaf
2 tbsp. fresh lemon juice
1 lb. salmon filet, skinned, cut into 1 inch chunks
3 tbsp. extra virgin olive oil
2 tsp. coarsly chopped fresh dill
freshly ground pepper
1 small red onion, sliced thinly
1 small cucumber, peeled, seeds removed, halved lengthwise and cut into 1/4" slices
lemon wedges, for serving

Put barley and 1 1/4 cups of water into a medium saucepan. Bring to a boil, cover and reduce heat to medium low. Simmer until the water has been absorbed and barley is tender, around 30 minutes. Fluff with a fork, cover, and set aside.

Bring wine, 5 cups of water, peppercorns, bay leaf, 1/2 tsp. of salt, and 1 tbsp. lemon juice to a boil in a large, high-sided skillet over medium high heat. Reduce heat to medium low, then simmer 5 minutes. Add salmon, and cook about 4 minutes. using a slotted spoon, remove salmon to a dish, cover and let stand for 5 minutes.

Whisk together remaining 1 tbsp. lemon juice, oil, dill, and remaining 1/2 tsp. salt in a small bowl. Season with pepper. Toss together barley, salmon, onion, and cucumber in a large bowl. Gently fold in vinaigrette. Divide among plates; garnish with dill sprigs and serve with lemon wedges, and flavorful tomatoes, if you've got 'em.

22.5.06

C-o-m-f-o-r-t


Sometimes, the most difficult thing about being busy is not being able to stick to your "routine." Humans, by nature, are creatures of habit. When we're children and beyond - including the college students in the classes I teach - we will chose a seat the first day of class, and more often than not, will return to that same seat the rest of the semester. Most people have a 'morning routine' and a 'bedtime' routine...we'll wash our faces, brush our teeth, eat in the same place every night...those types of things. Me, I like to come home from work, feed the dogs (or nag Dr. Loving Boyfriend to do it, as every good Dr. has a good woman to keep him in line), set to work preparing dinner, eat it at the table, in my chair, then relax and do whatever I'm feeling like that evening. And let me tell you, I really like to read my food magazines, get ideas for things I want to make, go to the grocery store, all that foodie-type stuff...

But being so busy lately, my food magazines have been piling up, unread. My fridge, usually bursting to the hilt from my trips to the farmer's market, has become devoid of vegetables and other perishables, save what we purchased for single dinners while Loving Boyfriend's parents were here), and I haven't opened a cupboard, planned a meal, or banged around a pan in weeks. This weekend was my revenge.

Last week, after working long hours non-stop, after entertaining (although, Loving Boyfriend, being the gem that he is, did most of the cooking) for nearly a week every evening, I dropped one of my precious experiments on the floor at the very last step. It was horrible. I knew it would take me an entire week to re-do that single part of my experiment. I wanted to cry. I wanted to throw things. I called Loving Boyfriend and whined. And then I did as every foodie must do: I prompty went out, drove straight to my favorite kitchen store, and bought myself a pan I'd been wanting for quite some time - a madeline mold. This weekend, I finally got to use it.

Sometimes, comfort for me is in following my routine. Sometimes it's taking a hike or getting out in the sunshine when I've been couped up inside a building for too long. Sometimes it's driving an hour to the coast just to sit in front of that big grey ocean and let it work its magic on me. Sometimes it's just laying around on the couch watching a movie or reading a book or a magazine. And over the last year, comfort has become getting into my kitchen, banging some pans around, and making something to eat. This weekend, comfort came in the shape of those soft, cake-like distinctively shell-shaped madeline cookies, and a steaming cup of hot tea.

May you find your own little piece of comfort today.

Orange-Cardamom Madeleines, from Martha Stewart Living
Makes 2 dozen

Batter:
1/4 cup unsalted butter, plus more for pan
1 tbsp. good-quality honey
1 tsp. vanilla extract
3/4 cup all-purpose flour
1 tsp. baking powder
3/4 tsp. ground cardamom
1/4 tsp. salt
1/4 cup granulated sugar
2 large eggs

Glaze:
3/4 cup confectioner's sugar
1 tsp finely grated orange zest
2 tbsp. strained orange juice

Brush the molds of a madeline pan with butter, then set aside. Make the batter: Melt butter in a small saucepan over low heat. Remove from heat, then stir in honey and vanilla. Let cool 10 minutes.

Preheat the oven to 325F. Whisk flour, baking powder, salt, and cardamom together in a small bowl; set aside. Stir together the eggs and sugar in a medium bowl and fold in the the flour mixture until combined. Add the butter mixture and fold in until combined. Cover with plastic wrap and refrigerate for 30 minutes.

Spoon batter into prepared pan, filling each mold halfway. Tap the pan against the counter to remove any air bubbles. Bake until cookies are puffed and golden around the edges; about 7-8 minutes. Transfer pan to a wire rack and allow to cool about 10 minutes. Unmold cookies onto rack and let cool completely.

Make the glaze: Stir together the sugar, orange zest and orange juice in a small bowl until the glaze is smooth, thick and opaque. Coat the ridged side of each cookie with glaze using a small pastry brush. Let set 15 minutes. Cookies can be stored in an airtight container for up to 3 days, but truly, they are best the first day as they begin to get a bit soggy after a few days.

My notes: The glaze wasn't as thick as it needed to be - the first round soaked right into the cookie instead of sitting on top of it, so I added more confectioner's sugar until it was a bit thicker. Also, it's difficult to only fill the molds up halfway (what's halfway in a madeline mold?!), so mine ended up being a bit bigger and I only got about 1.5 dozen. The cookies are quite sweet due to the glaze, but the cardamom leaves a very nice spicy bite at the end. I do think they are best with tea (I like Earl Grey with them) to cut through the sweetness of the glaze.

12.5.06

Big News!

Hi everyone!

I'm sorry I've been missing for the last two weeks with nary a word...Loving Boyfriend just become Dr. Loving Boyfriend! He successfully defended his dissertation on Friday! Due to all of his hard work coming to completion, I've been trying to finish a series of time-sensitive experiments so that I could celebrate with him (and hang out with his parents) and haven't had even 5 minutes to sit down at my computer since my committee meeting (I know, boo hoo, but I'm being honest!)...so please accept my apologies for not getting on here to tell you what's up.

Needless to say, I also haven't set foot in my kitchen since my committee meeting either, so I haven't had anything to post (this really does make me want to cry)...but rest assured that I have big plans in the future...as soon as his parents leave on Thursday. So, thank you for stopping by, once again, I'm sorry that I suddenly disappeared, and I hope you'll come back and see us again soon. Thank you for all of your kind comments - I've missed all of you and I'll be doing the rounds soon to see what you've been up to! Talk to you soon!

27.4.06

Just a note

Apples, before they become apples.

Just a note: I haven't been able to come around and comment on all of your blogs as much as I would like to, so I just wanted you to know that I haven't gone missing and I am still peeking in whenever I have a few moments of time, but things are just really busy right now. I have my committee meeting on Monday - where I'll be getting down on my knees and begging the panel of professors who gets to decide if and when I can graduate (well, close enough of a description, anyway), so hopefully I'll be back to check up on all of you as soon as that's over and I have a little extra time to do the other things I enjoy. Until then, happy cooking! I can't wait to see what wonderful things have been coming out of your kitchens!

Best, Michelle

23.4.06

In my Sweet Kitchen


Reagan Daley's book, In the Sweet Kitchen, is an amazing assortment of information, simple recipes, flavor charts and delicious goodness in one large, hardbacked package. Following the exuberant praise for the book and killer brownie recipe from Rob at Hungry in Hogtown, I knew I had to see what all the hype was about (Rob's blog, co-written with his wife Rachel, is highly entertaining and filled with creative, innovative food science, molecular gastronomy, funny references to classic tunes and hilarious stories, so go check them out!). Futhermore, also following Rob and Rachel's excellent suggestion to test out cookbooks at the library before handing over the big bucks to buy them (except that now I have found more books that I simply must have...which may not be a good thing), I picked it up at the Eugene Public Library, and quickly came to the conclusion that this book was going to have to be added to my collection. Being a scientist, however, comes with a set of rules, aptly called "The Scientific Method," that any conclusion must be based upon. As any scientist knows, there are some basic rules that must be adhered to when using the Scientific Method.

Rule #1: State the Question
Is this a book that MUST to be added to my collection?

Rule #2: Research the topic, investigate what others have learned and gather information through observations. Observation: Rob and Rachel, two trusted culinary geniuses as far as my small world is concerned, go gaga over this book. Furthermore, I have drooled repeatedly over their brownie recipe, and know that Rachel, a brownie queen picky of her brownies (see link above), highly recommends them. Plus, I don't have enough cookbooks compared to all my foodie friends (according to previous research) and it's a big, gorgeous, lovely-looking volume with some amazingly beautiful vanilla beans grouped together on the front. It's also filled with lots of charts and bunches and bunches of simple-looking recipes and helpful, straight-forward information.

Rule #3: State your hypothesis (make a prediction). This should be a simple, testable, 'if...then' statement.
"If I make a recipe from this book that turns out so amazing that I can't imagine not ever making it again, then I will have to purchase the book for myself." Or, alternatively, steal it from the library. Which of course, I cannot do as a good, upstanding citizen, so therefore, it must be purchased with my meager expendable funds.

Rule #4: Test the hypothesis.

Make The Ultimate Chewy and Soft Chocolate Chunk Cookies, from In the Sweet Kitchen

Rule #6: Draw your conclusions and report the results.
This recipe is a definate keeper, thus, since both the brownie recipe and the cookie recipe are keepers, then the book simply must be purchased and added to my collection.

Rule #7: Repeat to see if the conclusions are valid.
No problem here! It's the 'rules,' after all...must go make more cookies...

18.4.06

And the morel of the story is...


Once upon a time, there was a sweet, dainty scientist named Michelle who loved to frequent her local Farmer's Market every Saturday. She wanted her significant other, Loving Boyfriend, to go with her to the Saturday Market to pick out the freshest-looking seasonal fruits and vegetables with which to make their meals for the week ahead. Sweet, dainty Michelle thought to herself, "Oh what a lovely time we will have, planning our meals together, picking out food together, and talking to the local farmers." In fact, sweet, dainty Michelle couldn't think of any other thing that she would want to do more on a gorgeous Saturday morning than spend time with her man and looking at and touching beautiful food.

So one day, sweet, dainty Michelle asked her Loving Boyfriend if he would like to come with her to the Saturday Farmer's Market. Loving Boyfriend, however, preferred instead to sit on his butt in the house and play his Sony Playstation 2, which sweet, dainty Michelle bought for him for his birthday last year. Sweet, dainty Michelle didn't realize that when she purchased the Sony Playstation for Loving Boyfriend, it meant that the purchase of the little black machine would mean he would want to spend hours and hours playing with it, and pretending not to hear sweet, dainty Michelle's pleas to clean the house, or especially when she wanted to do something that he just preferred that she went and did by herself.

Sweet, dainty Michelle asked Loving Boyfriend to come with her a second time; a third time; a fourth time. And still, no decent response from her loved one. So she began to beg him. "Puulllleeeeeeese," she begged, "Come with me! It will be fun!" Still, he drew further and further into his Playstation videogame world. So she began to nag him. Still, no measurable response. She even tried putting on a small, skimpy outfit and sat down right on his lap, hoping to grab his attention. But alas, he simply looked around her and continued his playing. So, finally, with no other option available to her, she began to threaten him. "You'd better come, or else..." "Or else what?" He would ask, then return to his game. Sweet, dainty Michelle wasn't the quickest with witty comebacks so, disappointed and more than a little unlady-like, sweet, dainty Michelle began to pout and stormed away, leaving Loving Boyfriend to his game.

Alone in her kitchen, she began to devise a secret plan. She would go to the Farmer's Market and pick out the most wonderful ingredients for the most wonderful meal she could imagine. She would come home and begin cooking it, making amazing smells waft out from the kitchen and into the living room, where Loving Boyfriend was sure to smell it, despite his mind being elsewhere. She knew this would work, because it had worked for her friend Michele in Paris, with her significant other. Then she would put it on the most beautiful plate and set the most beautiful table, and wait for her Loving Boyfriend to come to her. There, undistracted, she could explain to him how much it would mean to her if he would just go with her. How could a plan this perfect not work?

So sweet, dainty Michelle set out to the Farmer's Market and while browsing about, she spied Loving Boyfriend's favorite mushroom, the most lovely morel, Morchella angusticeps (remember, she is a scientist, after all). "Perfect!" She thought, "He could not resist this, his favorite mushroom!" She immediately picked up several of them, as the season out here in the Pacific Northwest is short, and morels are not a common sight at the Market. While she was there, she also picked up some fresh parsely, peas, and a glorious block of fontina cheese. All the while, the wheels in her head kept on turning, devising a delicious meal with which to seduce Loving Boyfriend away from his little black box.

When she returned home, she looked about the house and found that Loving Boyfriend had not moved from his spot. Around him were piles of clothes that needed folding, dog hair tufts on the carpet next to him, and dirty dishes - the last bit of cleaning that sweet, dainty Michelle had decided to leave as a test to see if Loving Boyfriend would notice and give up his game to help out around the house to make his girlfriend happy. She sighed, then donned her cutest apron, and started cutting up fresh vegetables in the kitchen. She had decided to make a Risotto with Morel and Petite Pea Ragout. She knew that with the vegetables cooking in oil and the chicken stock she had made to get rid of an awful spot on a roasted chicken a few days ago, the smells coming out of the room would be irresistable.

She sauteed the vegetables in a little butter and oil, until the morels were crispy and the onions were soft, then added the arborio rice to help bring out the starch from the pretty, short grains. She added a dash of white wine, then poured a ladle full of the deliciously golden chicken stock into the pan and began stirring. She then poured a glass of the wine for herself, and admired how cute she looked in her apron. Surely, surely this would work. She continued adding ladles of the stock to the mixture, watching with pure glee at how creamy the dish was becoming as starch continued releasing from the rice. Time passed quickly and before she knew it, she was setting the table and putting the risotto on a plate. It was now the final hour of her quest, and she was certain she would be victorious.

She set the plates on the table, lit a candle, then called out to Loving Boyfriend. "Dinner! I made your favorite..." Loving Boyfriend came to the table..."Wow, this smells amazing. And morels, my favorite!" "It's working," she thought to herself, beaming on the inside. So they sat down and ate her wonderful meal, and enjoyed every last bite. But it was time...

"Loving Boyfriend, would you please come to the Farmer's Market with me?" Sweet, dainty Michelle asked gently, in the most syrupy girl voice she could muster.

"Nah, honey, you went by yourself today and just look at what you made from it! I could never make anything even remotely as good as this!" And with that, he was up and heading back to the living room to his little black box.

"Hey, that apron looks really cute on you," he yelled out from the other room. "Oh, and by the way, you left some clothes out here in the living room this morning!"

Sweet, dainty Michelle, suddenly feeling not so sweet anymore, started planning how she would rid herself of the little block box that had usurped her...

**Note: all facts in this story have been whole-heartedly embellished for your pleasure, my dear readers. Loving Boyfriend does not really ignore me for his Playstation. Besides, when he does have an inclination towards that front, I simply start rapidly cleaning house around him until he feels guilty enough to quite playing and come help me (guilt works wonders with Loving Boyfriend!). And I have managed to convince him to come with me to the Farmer's Market...once or twice. ;)


Risotto with Morel and Petite Pea Ragout
, adapted from Gourmet

The orginal recipe can be found here. It's a bit different from a 'normal' risotto where all the vegetables are cooked in with the rice - in this recipe, the ragout is made separately and then spooned on top. The only differences were that I used homemade chicken stock, double the amount of peas because I did not have asparagus, and I used fontina cheese instead of parmesan. The fontina was a nice addition and made the risotto even more creamy. I would have liked the ragout to be a bit thicker, but it was still nice, and next time, I'd add the asparagus (unless you really, really like peas), but the dish itself was delicious.

17.4.06

It's my birthday, and I'll make what I want to...


It's my birthday today, yep the BIG 2-8, and being the ahem, culinary wizard that I am...okay, strive to be, I wanted to make myself a cake. I bought a great cookbook when I was in Florida at the beginning of the year - The Golden Door Cooks Light and Easy, and I haven't cooked out of it yet, so I was browsing through the dessert recipes when I saw this one: Rosemary-Infused Chocolate Fudge Cake with Chocolate-Tofu Frosting. Wow - I coudn't pass that one up, especially considering I have so many great, great blogger friends that are trying to watch their waists, have food allergies or intolerances, or are trying to cook for someone they love that does, and lo and behold, this cake has no dairy and has a minimum amount of sugar (you could use Splenda if you wanted) and it's low in fat (for me!). I also think it could easily be made gluten free with a few adjustments (I actually thought it was when I first decided to make the recipe) - but I'm going to have to play around it with it bit. I'll update the recipe as I get around to it trying it again, tweaking it, and making it what I imagine it to be capable of too! After I returned from the grocery store, I also discovered didn't have the right sized pan (a 6" round), so I decided to make birthday cupcakes instead. So, without further adieu...


Rosemary-Infused Chocolate Fudge Cake with Chocolate-Tofu Frosting, from The Golden Door Cooks Light and Easy (needs a few adjustments)

Cake:
1 tsp. Vegetable oil
4 sprigs rosemary
1/2 cup hot, strong, freshly brewed coffee
1 tsp. vanilla extract
1 tsp. Kahlua or coffee brandy
1 large, ripe banana
1/2 cup packed brown sugar
1 cup unbleached rice flour, sifted
3/4 cup cocoa powder, sifted
1 tsp. baking powder
1/2 tsp. baking soda
1/4 tsp. ground cinnamon
4 egg whites, room temperature
1/4 tsp. kosher salt

Frosting:
1/2 cup firm silken tofu, drained (**sandwiched between 2 plates with paper towels!)
2 tbsp. pure maple syrup
2 tbsp. cocoa powder, sifted
2 tbsp. commercial chocolate soy milk

Preheat the oven to 375 F. Grease a 6" round baking pan with the vegetable oil and set aside
Steep the rosemary sprigs in the hot coffee for 15 minutes. Remove the sprigs, set aside and cool. Pour the cooled rosemary-infused coffee, vanilla extract and Kahlua or coffee brandy into a blender or food processor. Add the banana and process until smooth. Transfer to a small mixing bowl and stir in the brown sugar.

In another large bowl, combine the flour, the cocoa powder, baking powder, baking soda and cinnamon. Stir in the coffee, banana and brown sugar mixture; mix well.

Using an electric mixer with a whip attachment (or hand mixer), beat egg whites and salt at high speed until they form soft peaks. Gently fold the whipped egg whites and salt at high speed until they are fully incorporated. Pour into the prepared pan; bake for 30 to 40 minutes, or until a toothpick inserted into the center comes out clean (cupcakes took about 20 minutes). Remove from the oven, turn out onto a rack, and let cool completely.

For the frosting, combine the drained tofu, maple syrup, cocoa powder and soy milk in a blender or food processor. Process until smooth, then transfer to a bowl. When the cake has cooled completely, use a spatula to frost the top and sides of the cake. (I piped the frosting on the cupcakes with a 1/2 inch round tip).

My Notes: To be honest, my cupcakes needed a little bit of help, and the recipe needs a little bit of tweaking in my opinion, but it's got great potential. One, don't over-cook it - as I've said a hundred times, my oven sucks, so the bottom and edges got cooked a little too much, which made them dry, but the middle was moist and delicious, which I'm guessing the entire cake should be. I also think the banana I bought wasn't big enough, because my batter was kind of dry when I tried to fold in the egg whites so I had to actually take a whisk to it (I know, bad, bad girl!) but I would like to try applesauce instead of a banana because the cake had a distinctive banana flavor that I think took away from the rosemary and chocolate and coffee flavors. Again, I think this could be made gluten free, I just have to figure out how to do it. Also, be sure to drain the tofu - meaning, not just dumping out the water, but letting it drain into paper towels sandwhiched between a couple of plates for quite a while. I had to add more cocoa powder and squeeze a bunch of tofu to get the frosting to be a spreadable/pipeable consistency because the 1/2 cup I added was just water-dumped-out 'drained.' The cupcakes did rise a bit, so only fill them 3/4 full if you go that route. I would also maybe try mint instead of rosemary, although I did enjoy the slight rosemary flavor. If you tweak it, let me know how it turns out!

Now...for a little birthday indulgence...I haven't had the time lately at work to get around to checking all of my favorite blogs...so lest you think I have forgotten you all (I haven't!) I'm going to go say hello and see what you've been up to! Have a wonderful, happy Monday!

16.4.06

Happy Easter!


This may reach some of you a bit late because having to go into work on the weekend to use the computer is on the bottom of my list most days, but lucky for me I had to come into work this weekend, so I was able to actually post this on Easter! So for those of you that celebrate, Happy, happy Easter to you!! I hope you all had a wonderful weekend full of delicious delights!

These were two of my Easter projects - coloring eggs (I did those top ones just for you...don't you feel special? Good. Because you are!) and an attempt to make Peeps with my very good friend Kristin. (Hi Kristin!)

Kristin and I were attempting to make these. You're supposed to make marshmallow 'batter' and then pipe them out into cute little Easter shapes, then cover them with superfine sugar and colored luster dust. Yes, these are our two best ones (in case you can't tell, that's a bunny rabbit on the left and a chick on the right), and no they don't have eyes, but we had a wonderfully sticky, messy fun time anyway! We discovered that we are most certainly NOT Martha Stewart, and we wouldn't want to be either! We ended up just making regular marshmallows - my recipe is here - and cutting out fun shapes with cookie cutters. Maybe next year is the year of the Peeps...

14.4.06

A heart attack on one big, delicious plate


Warning: Don't make this if you're worried about your arteries. Do make this if you can muster up enough gumption to save your fat and cholesterol calories, grams, and milligrams for days by eating only lettuce and/or other heathly roughage; because it's positively delectable.

The dried pasta you can get at a store just isn't comparable to homemade, fresh pasta. Loving Boyfriend and I scored a Marcato Atlas 150 Pasta Maker at a Goodwill store in Bend, OR last year for the bargain price of $10. We've used it probably 5 or 6 times, and although it sits lonely on its little shelf space for most of the year, unused, every time we actually get around to making pasta with it, we remember how amazing it tastes and vow to make homemade pasta far more often. But even though this has never fully come to fruition, I still love our $10 pasta roller with all my culinary heart, and I swear that somehow, some way, it's getting packed into the 400 cubic feet that we're allowed to bring to Hawaii with us when we move next year.


I don't know how long ago I aquired the cookbook, In the Vineyard Kitchen: Menus Inspired by the Seasons (Maria Helm Sinskey), from a bargain bin, and although all of the recipes look quite tasty, I had yet to crack it open and actually whip one up. Then, recently, while reading through the book, I saw a recipe for Pumpkin tortellini with sage brown butter, and thinking of the pumpkin puree I had made in the Fall and stored in my freezer "for a rainy day," I knew I would be making it soon.

Last weekend, that time finally came when Loving Boyfriend actually said: "Let's make a big, elaborate dinner tonight." Now, pick your jaw off the floor - it's true! He really did say it! So I said "Okay! I have the perfect recipe. You're in charge of making the pasta dough" (He's the dough maker in our relationship). Well, he did. And here's the proof: (And if you even think for a moment that no, it has to be Michelle, boys don't want to make elaborate dinners and whip up pasta dough at their girlfriend's sultry whim, just you look at those hairy hands. And if you think MY dainty little girl hands look that hairy then you should just stop reading my blog RIGHT NOW!)


So we labored over the pasta dough, letting it rest at all the appropriate times, for all the appropriate lengths of time...okay, well, Loving Boyfriend labored over the pasta dough, but I labored over my glass of 2003 Dominio de Tares Albares, which was just as time-consuming in between all those "Oh, this is good," sip sip. "Really good." sniff. sip. sip. sip. And then set to work making the pumpkin filling (er, after sending Best Loving Boyfriend out to the grocery store because I forgot to buy the fontina that goes in it and holds everything together...oops), and trying to roll and shape little circles of pasta dough into pretty little tortellini.


Which isn't as easy as the directions made it sound.

Loving Boyfriend and I discovered that we are not good tortellini makers. In fact, even though we read the directions several times, our tortellini were not pretty (except for the single one up top, admittedly not belonging to your truly, but to LB), and not a single one looked like any of the others. But, who cares? They tasted good and that's all we cared about. By the time 9 pm rolled around (Wait, did it really take us that long? Yes.), we were starving, and the little pasta pillows were finally out of the water and the butter was browned and the sage leaves had been transformed into crispy little jewels. We plated our pasta, and enjoyed every last bite of the fruits of our labor, heart attack potential and all. Now for some more of that roughage...


Pumpkin Tortellini with Sage Brown Butter, from In the Vineyard Kitchen

Pasta Dough
3 1/2 cups all-purpose four (or 2 cups all-purpose and 1 1/2 semolina)
2 tsp. salt
5 large eggs
1 tbsp. extra virgin olive oil

Mix the flour (and semolina, if you're using it) and salt together in a mixing bowl. Whisk the eggs and oilve oil together in a separate bowl. Make a well in the flour and add the egg mixture. Mix until well combined. If the dough is too dry, add a few drops of water. Knead until smooth and elastic. Turn out onto the counter and knead a few more times. Cut into two equal pieces and let it rest at room temperature, wrapped in plastic, for 1 hour. Roll the pasta dough out with a pasta machine following the manufactures instructions, and letting the dough rest (covered) after the first round of kneading in the machine. Roll out to the 2nd thinnest setting, dusting lightly with flour as needed. Lay the rolled pasta out on a counter dusted with flour, then cut out circles with a 2 3/4 inch round cutter. You can also do this by hand, by rolling the dough out to 1/4 inch, letting it rest for 10 minutes, then rolling it out again to the thickness of thin, thin cardboard with a lightly floured rolling pin, but it's much, much easier with a pasta machine.

Pumpkin Filling
2 cups pumpkin puree with no liquid added (or one 15 oz can solid pack pumpkin)
2 tsp. chopped fresh thyme
2 tsp. chopped fresh sage
1/2 cup grated fontina
1/2 cup mascarpone
4 tbsp. brown sugar
salt and freshly ground black pepper to taste

Place all ingredients in a bowl and mix thoroughly. Can be made up to 2 days in advance; refrigerate in an airtight container.

Assembly
Place 1/2 tsp. of pumpkin filling in the center of each pasta circle. Using your finger, dampen half of the edge of the circle with a small amount of cold water. Fold the dough over, and press the two pieces of pasta together to seal, starting from the folded edge. Push out any air bubbles as you go. Dampen one point of the folded edge and bring the other point over, pressing together. Place them on a baking sheet dusted with flour and cover until you are ready to cook them. (These can be frozen for up to a week - do not thaw before you cook them.)

Preheat an oven to 250 F. Bring a large pot of lightly salted water to boil. Add half the tortellini to the pot and bring back to a simmer (Do not let boil again! It will damage the tortellini and the filling might burst out!), reducing heat as necessary. After they rise to the top, let them cook for 1-2 more minutes. Remove them from the water with a slotted spoon, and place them on a sheet pan drizzled with olive oil and cover with foil to keep them warm. Repeat with the remaining tortellini, then place the sheet pan in the heated oven to keep warm while you prepare the sauce.

Sage Brown Butter
16 tbsps (2 sticks) unsalted butter
64 medium sage leaves
salt

Melt butter in a saucepan over medium heat. Add the sage leaves and cook until the butter turns light brown and begins to foam (~ 2-3 minutes). Shake and stir the sage leaves so that they cook evenly and become crisp (these are SO good!). Remove the pan from the heat and immediately sprinkle with a little salt. Drizzle the hot butter over the pasta, and divide up the sage leaves among the plates.

12.4.06

Fish, again?


When your father lives in Alaska, and is feeling super generous, he will sometimes bless you by bringing you pounds and pounds of wild, freshly caught, flash-frozen and vacuum-packed fillets of gorgeous Alaskan salmon and halibut. Heck, as a bonus he might even throw in a bunch of lean, delicious caribou as well, if you're lucky (well, lucky me...).

In turn, you could then use this opportunity to justify to yourself the purchase of a big extra (Energystar) freezer just to store your newfound culinary wealth in. Once you have this taken care of, the only slight conundrum to this whole wonderful situation facing you is: you now have a freezer full of food and you must come up with enough recipes so that you don't get bored eating it.

Now, this is the type of challenge I can really get into.

We've actually finished off the caribou (see my caribou chili recipe here), and mostly decimated our stocks of both salmon and halibut. Recently, however, I was craving some of that remaining halibut and did a search on the Internet for recipes that 1) did not resemble something I had ever made with halibut before, and 2) contained mostly ingredients I had on hand or could substitute easily.

This is what I came up with: Individual spicy seafood potpies.

You can view the original recipe here, and my bastardized version is below. Even with all of my substitutions and odd way of putting it together, the finished dish still came out fabulously tasty - it's got just enough spice to add a bit of a bite, but not be too hot. We even ate the leftovers the next day for lunch with some crusty 10-seed whole grain bread (I'm usually very against eating fish the next day, but we've never had problems with our halibut or salmon getting that fishy, next-day flavor to it, so we do it often).

Individual spicy seafood potpies, adapted from Martha Stewart Living

1 large shallot, minced
1/2 cup dry white wine
1/2 cup water
1 tsp. salt

Combine in a small saucepan, bring to a simmer, then cook for 2 minutes. Set aside (I didn't strain it either, but you can if you'd like). I did this because I didn't have the mussels called for in the orginal recipe, but still wanted the wine flavor and shallot in the end dish. Alternatively, and the smarter way, would be to add the shallot at the next step with the garlic and onions, and add the wine in the end when you're cooking the whole mixture (or after you saute the anchovies and let it cook down if you just want the alcohol flavor) but my brain didn't work quite so efficiently as this. So, do what you think is best, and read on.

2 tbsp. olive oil
2 cloves garlic, minced
1 medium onion, chopped
3 anchovy fillets, finely chopped
1 28-oz. can of Italian plum tomatoes
1/2 tsp. crushed red pepper flakes

Heat oil in a medium straight-sided saute pan over medium heat. Cook onions (you could add your shallots here instead) until soft, then add garlic and cook for about 30 seconds. Add the anchovy fillets, and cook them an additional 2 minutes, stirring constantly (you could add the wine here too). Raise the heat to medium high, and add the tomatoes (we used home-canned heirloom tomatoes, so I drained them, then added a bit of tomato puree to help keep the liquid and flavor up. Break them up a bit with your spoon, add the wine mixture, then stir in the red pepper flakes. Cook until the mixture becomes thickened, about 25 minutes. The original recipe calls for you to puree this mixture until smooth, but because I was missing most of the seafood, didn't do this because I wanted it to be chunky.

Heat your oven to 425 F. I used pre-made puff pastry shells (from the freezer section) instead of rounds cut from puff pastry to top off my potpies because I had some in the freezer left over from the Pumpkin-filled pastry shells with maple caramel syrup I made a while back. I just cooked the puff pastry shells according to the directions on the back, then spooned the finished potpie mixture into them. You can use whatever you'd like. If you're using the rounds, cook them separately according to the original recipe. You can either cook the potpie mixture in individual 6-oz ramekins, or what I did, in a large casserole dish, just be sure if you're cooking in ramekins to put a baking sheet underneath them in case they bubble out. I might actually use the ramekins next time, because the shells get a big soggy after they sit with the potpie mixture in them - but they were still really tasty, you just have to eat a little faster!

1 tbsp. fresh thyme, chopped
1 tbsp. fresh flat-leaf parsley, chopped, plus more for garnish
salt and freshly ground black pepper to taste
8 oz. of fresh halibut, skin removed and cut into 1 inch pieces
(I also added a small package of frozen shrimp to mine)

Add thyme and parsley to potpie mixture and season to taste. Stir in the halibut (and shrimp), and put it all in an oven-proof casserole dish. Bake until juicy and bubbling, about 15-20 minutes. To serve, spoon the potpie mixture onto/into the puff pastry shells, sprinkle with parsley, and add a green salad on the side. And even if you don't have any puff pastry, just eat it with some crusty bread and it's just as good. YUM!

11.4.06

Yesterday

"Let's ride bikes," He sez. "It's beautiful out."
"I don't know," I say. "It might rain this afternoon..."
"Nah, you won't even need your rain stuff - just look at that blue sky!" He sez.
"Okay," I say.

Sure, it was beautiful on the ride in.
It was the ride home that sucked.

Let me just say two words: Torrential downpour.

"Let's ride bikes," He sez.
Sure, LB. Sure.

6.4.06

That's NOT supposed to be in my chicken!

Happy 100th post, to me.

Ah, the things I have learned over these last 100 posts...the friends I have made, the pictures I have taken, the stories that have unfolded... I was feeling very comforted as I thought about what I would like to post for my big 1-0-0. So, this on my mind, and thinking of all of the new recipes I had tried and new dishes I had attempted, I decided I wanted to do something classic: A roasted chicken.

But alas, no picture today. Believe me when I say that this is a blessing for you. You wouldn't have wanted to see a picture of my chicken anyway... or at least not what was hiding, nestled inside the leg of this particular chicken...

I was trying out Martha Stewart's version of roasted chicken, cooked on a bed of thickly sliced onions and with sprigs of tarragon and thin slices of garlic placed gently between the skin and the breast meat, giving it a deliciously subtle, yet still distinct, anise-y flavor (not too much as you wouldn't want that "grassy, manure-like" smell that you can get with tarragon, according to Nigella Lawson in her fabulous cookbook/food philosophy How to Eat). Everything went as well as it possibly could have, considering that I could not, for the life of me, figure out how to tuck those dumb wings under the damn bird (although I know I have done it correctly in the past!) and I still have never figured out exactly how to truss my feathered friend up. Additionally, I still get slightly grossed out pulling all the giblets (I did finally learn that this is pronounced "jib-lets," not giblets, right?) and messing around with all that extra butt skin...er, is that the neck? Whatever.

And that's just the physical act of preparing to roast a whole chicken... While doing all of this necessary fussing, a psychological war also rages: I am on the homefront, fending off all of those little tiny salmonella that I just know are hopping off of said bird onto my clean counter and playing frisbee or rugby for a while there, spreading themselves about, before beginning a game of hide and seek just as I get out the freshly microwaved sponge... yep, just there having a hayday and waiting to make me horribly ill and running for the toilet for days to come. Don't even talk to me about rubbing butter on the skin of the bird either...all I can think about is an excerpt from The Julie/Julia Project where she quotes Silence of the Lambs - "...it rubs the lotion on its skin or else it gets the hose again..." Once I get past all that, I'm fine...usually.

Back to my story, though....in the oven the bird goes, in the very cheap and large roasting pan we bought to cook the turkey in for Thanksgiving when my father and stepmother came to visit two years ago, and I start washing things up/fighting the salmonella. Only to have the beejeezus scared out of me when a bomb goes off behind me...BOOOOOM! It took me quite a while to climb down from the ceiling and realize that the "bomb" was the pan warping into a twisted, bizarre-looking rendition of a metal artist's take on "Sideways Pan" in the oven. I peeked in and my poorly trussed chicken had slipped off its bed of onions and slid to one side of the pan. Nevermind that, I've dealt with this before. I simply pushed one of the onions under the bird, add some tin foil under one side of the pan (did I mention the pan doesn't really fit in our oven very well either? And that it sucks?), and on I went.

After a fair amount of time (it felt like a friggin' eternity I was so hungry!), I pulled my beautifully browned, crispy organic free-range blah blah blah bird out of my oven. You must understand that the beauty of this particular bird was a formidable feat in itself since my oven is over 100 degrees above what that little dial on the front says, and that's just in the front of the oven. The back of the oven is probably more like 400 degrees over the dial...but I haven't gotten brave enough to stick the little life-saving oven thermometer (do get one of these, please!) back there yet...even when the oven is off, it's still scary back there. I tested the temperature of the bird with an instant read thermometer and it said it was go time. So I let the chicken sit for a good 10 or 15 minutes just like I was supposed to, to save all those precious juices. I didn't take pictures, because by then I had figured that "Everyone but me can roast a stupid chicken," but now I wish I had. Here, I'll cheat: photo courtesy of Martha Stewart.


Now, where was I?

Oh, the carving. This was a disaster. I tried to follow the carving instructions on the website...cut down the leg, severing the joint (EW.) Cut the thigh loose from the drumstick (EW.)...okay, doing fine...not pretty, but I got the job done. I'll get to the other side in a second...I wanted to start on the breast meat. I cut along the backbone and starting trying to slice sideways "following the contour of the ribcage," (EW.) and this was just a mess. My pieces of chicken breast were not pretty. For that matter, neither was my thigh or drumstick, but I figured the breast should be the easy part. Nope, not easy. I whined loudly out to Loving Boyfriend, who was in the other room. Then I gave up on demolishing the breast meat and went to the other leg. Here's where it got nasty.

I dug the knife in, trying to see where it was going and pulled the meat back a bit so that I could see that pesky bone...but when I pulled the leg back, there was a BIG BLOODY SPOT HANGING OUT IN THERE!!!! Not like a little colored spot that got into the meat, like you get sometimes when you cook chicken breasts, but a BIG BLOODY JUICY SPOT GELLED UP AND LIVING COMFORTABLY IN THERE!!!! And, it was about the size of a QUARTER!!! EEEEEEEEWWWWWWW!!!

"Oh GROSS!" I yelled at Loving Boyfriend. "That's just NASTY!!"

"What? What's wrong?" Loving Boyfriend swooped in from the living room.

"There's a BIG BLOODY SPOT ON MY CHICKEN!! IT'S NOT DONE! WHY ISN'T IT DONE??? THE THERMOMETER SAID IT WAS DONE BUT IT'S GOT A BIG BLOODY SPOT. A BIG. BLOODY. SPOT. RIGHT THERE. EEEEEEEWWWWWW!!!"

"Oh, that happens sometimes, honey. It's probably finished. Look, the breast looks okay."

"But there's a SPOT. RIGHT THERE!! EEEEEEWWWW!!!!"

This exchange was followed by lots of irrepressible shudders on my part, which still come about unprovoked even days later, and Loving Boyfriend taking over the carving.

Needless to say, I only ate the breast meat. And I'm not sure what happened to the BLOODY SPOT...maybe it's still living in there, relaxing on its cushy leg chair. I think that even if I can muster up the stomach to roast another whole chicken someday, I might never have the stomach to carve another one.

Ah, yes, the adventures I have had...the lessons I have learned...

THERE HAD BETTER NEVER BE ANOTHER BLOODY SPOT ON MY CHICKEN LEG!!

4.4.06

1...2...3...Quiche!


Quiche is an extremely easy dish to make. It's wonderful because you can put almost anything in a quiche, and it ends up tasting great. Thus, a quiche is an excellent way to clean out the refrigerator, use up leftovers, or stretch that one last carrot or head of broccoli or onion that's about to go bad and that you somehow have to make a meal out of because you have nothing else left in the house. Quiche is also so incredibly versatile in that you can eat it for breakfast, lunch, brunch, dinner, supper, or even a late night snack! It can be served hot, cold, warm, or room temperature, and the leftovers are just as good as when you made it!

The best thing about quiche, however, is that it's as easy as 1...2...3...

1. CRUST
Make your own if you'd like - any traditional pie crust will do. Or you could be adventurous and make one out of vegetables or crushed nuts, lay down some leftover pasta, or even just put down some cheese. I'd like to experiment with making different types of crust, but I haven't gotten to that yet (along with about a thousand other things). Rest assured that when I do, I'll detail my exploits on here for you. When I'm in a pinch, which is usually the case, I'll just pick up a decent brand of pre-made frozen pie crust that I know is good (I often go with a deep-dish pie, because I love having extra crust to munch on, but both will work). The crust we used for this quiche was Loving Boyfriend's fine apple pie crust. I simply had him make an extra crust when he made apple pie this weekend, and kept it in the fridge until I needed it.

2. FILLING
Here, the possibilities are endless. First order of business, though, is the cheese. Any kind of cheese will do. Put a layer of grated cheese down first on the bottom of the crust. As it melts, the cheese seals the crust from excess moisture from your ingredients and keeps it from getting soggy. Then, on with the goodies: if you have hard vegetables (carrots, white onions, peppers, etc.), then you can saute them gently in olive oil beforehand. I also saute spinach, and garlic before I use them also, but just lightly. You could also use meats like prosciutto, or bacon, or even fish. Layer your goodies on top of your cheese, filling up the pie crust, and throw some fresh herbs (or things like nutmeg, paprika, etc.) on top. The particular quiche above had mozzarella, leeks, green garlic, spinach, slices of plum tomato, portabello mushroom, prosciutto, and fresh sage...basically leftovers from pizza on Friday with a few extras picked up at the Farmer's Market this Saturday.

3. CUSTARD
Once you've filled up your pie crust with goodies, it's time to add the custard that holds everything together in one luscious, creamy, eggy package. Here's how easy it is: beat together 3 whole eggs (or use the equivalent in egg whites, if you're watching your cholesterol) and 1 cup of milk (whatever kind of milk you use is fine; but do know that it will be richer and creamier with the more milkfat there is). Dump this gently over of the filling, dust with a little paprika if you'd like, and pop it in the oven at 375F for 35-40 minutes, or until the custard has set completely. That's it! You can make it a day or so ahead if you'd like, because it still tastes just as good. Serve it still warm, at room temperature or cold, whichever is your preference. I like mine room temperature or slightly warm.

Now you can make yourself quiche anytime, and it's so easy that you don't even need a recipe, so let those creative juices flow! One note: quiche is especially nice on a sunny, Spring day. Especially when it is the first sunny Spring day of the whole year after months and months and months of Oregon rain. Enjoy!


3.4.06

There's always time for pie


Pizza pie, that is (the other type of pie is a whole different post). Pizza is one of those good, homey comfort foods that never does you wrong. You can use tomato sauce or olive oil as a base, and any number or combination of toppings will do. But be forewarned: when you find one that works, it's hard to want to make anything else.

My own standby is Blue cheese, red onion, and pine nut pizza. I've been making this combination for years, and it's my absolute favorite pizza. This is the one that I make whenever I get to decide what goes on the pizza at home. Unfortunately, for me, since Loving Boyfriend is the crust-maker (he loves to flex his manly Italian muscles as he tosses the pizza in the air), I only rarely get to choose the toppings. His 'specialty' is his chicken-wing pizza (which is also excellent, especially dipped in blue cheese dressing...but I'll share this one at some later date if I can get his approval), so that's usually what gets made.

But when I am lucky enough to be able choose, this where my pizza loyalty lies. Today, I'm also going to share another pizza we just discovered this Friday during a quick stop to the grocery store, that may have just topped our pizza chart as a favorite to us both: Carmelized Onion and Balsamic Vegetable Pizza.

Make or buy your crust - we usually just pick up some freshly-made pizza dough from the grocery store, because it's quick and easy, but you know homemade is always better... Here...try Ilva's crust recipe...It's fabulous, and I'm sure that she won't mind... Roll it out to pizza size. Then, of course, there is the obligatory (and fun) tossing it up into the air and stretching it out on your hands. Just don't drop it on the floor - especially if you have two very large dogs who are always hungry and sitting there just waiting for you to drop the big doughy dog-cookie on the floor.

We cook ours on a pizza stone, at about 350 degrees. We preheat the oven with the stone inside, then get all the ingredients ready while it's heating. Take it out right before you're ready to lay on the toppings.

This is really so easy that you don't even need a recipe, but here's what you'll need:


Blue-cheese, red onion and pine nut pizza:

Good olive oil
Thinly sliced small red onion
Thinly sliced plum tomatoes (2)
Blue cheese, crumbled (we recently tried Rogue Creamery's new Smokey Blue on this pizza, which is also excellent in thin slices on toasted baguettes rubbed with garlic...)
a couple of tbsps of pine nuts
Mozzerella cheese (we used slices of fresh this time, but grated from a block will do also)
fresh basil, chiffonade (yes, those are little spots of dried basil in the picture, but do as I say, not as I do)

(chiffonade = shredded; just stack up a few leaves and roll them together tightly, then slice across very thinly)

Carmelized Onion and Balsamic Vegetable Pizza:
(**This is awesome, really. Something about the the sweet balsamic vinegar and the carmelized onion with the salty, tangy feta cheese and all the vegetables really balances out nicely**)

Good Balsamic Vinegar and Olive oil (mixed, heavier on the olive oil, but enough sweet balsamic to taste it; slather this on as your base)
1 small onion, thinly sliced and carmelized slowly over low heat
1 clove of garlic, minced and thrown in with the onions for the last 30 seconds
2 large handfuls of baby spinach
One thinly sliced plum tomato
One Portabello Mushroom, sliced
a few tbsp. of feta cheese, sprinkled about
Fresh Basil, chiffonade
Mozzerella, grated (or fresh)

We layer things in that order they're listed, pop the pizza in the oven, and about 20 minutes later, we're tearing into the gooey cheese and stuffing our faces with the stuff. Embarrassingly, Loving Boyfriend and I actually devoured an entire (medium to smallish sized) Carmelized onion and Balsamic pizza on Friday, all by ourselves. And enjoyed Every. Last. Bite.

Oink.